Assignment 2: The Fuel Tank
Aim:


Form a group of 10 students who are from different disciplines to make a 1:1 scale model of custom tank for a CB550. Our group will be divided into three groups to make three fuel tanks, and each student is responsible for one side of the fuel tank. We need to shape the aluminium shape to create a fuel tank.
Objectives:
- completed a model, which choose from the three options of fuel tanks.
- The surface must be smooth and even.
- The aluminium fuel tank has a flat and smooth edge.
- the seperate parts of fuel tank must be fit to other two sides.
- record the process of fabricating the fuel tank.
Equipments and tools:
- Sand bag
- File
- Hammers
- Tin snips
- Guillotine
- English wheel
Construction steps:
Moel construction
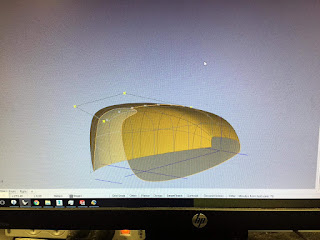
Firstly, we need to use photogrammetry to fabricate a 1:1 model of fuel tank so that it would be easy to shape the aluminium sheet according to this model. For this 3D model, we need to use revit.


For next step, we need to export the model from Revit to Autodesk Slicer. It is a software which can divide the 3D model into many components so that those slices can form a 1:1 scale model in real. Also, this software will be applied by laser cutting.


Our 3D model files is translated to plywood model. We collected the plywood slices and put them in the correct place according to the marks. So, the fuel tank model comes out.


To creare a smooth surface, we used the tape to cover the whole model. Also, it can protect the model from hitting.

Pattern Fabrication
As a group member, we divide each fuel tank into three parts. I am responsible for the right side of tank, Yaoyuan Wang and Xiaoyu Liu are responsible for the top side, Ziqing Wang will do the left side of tank.
Before we start shaping the aluminium sheet, we need to draw a paper template to describe each part of model. So, we can cut the aluminium sheet according to the shape of paper. The described paper is very important because it can be a ruler to measure and increase the accuracy.


We marked on the aluminium sheet and draw the shape of paper, then used the guillotine to cut the shape. The edge was very uneven after cutting, so we used the file to smooth the edge.
Metal shaping

I am responsible for the right side, so it is not that hard. At the beginning I hit the top of aluminium sheet and tried to bend it. But I realised that the whole sheet became very hard to curved if the top was bended. So my first project was fail, I abandoned it and started another new one. Mostly I was using the hammer to shape the aluminium sheet rather than other machine. Now I realise that it is wrong, we need to use more machine to help use to complete the project. Because those machines can help to reduce some problems such as large bulge towards to the back side, depression leading away from this bulge on the front side and very hard curves at the top, which is very hard to smooth it. So, it would be better to use the machine to shape the aluminium sheet at the early stage and make a roughly shape.
English Wheel helps to smooth and even the dents by hammering. But it can also change the radium of plate. Tutor gave me advice that I should use a big radium wheel to roll it and roll the plate from different directions, lastly, do it very gentle. After I took his advice, the surface was smooth and its radium didn't change that much.

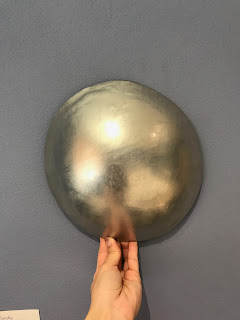
completed project (right side):


The whole fuel tank with groupmates' works


Comments
Post a Comment