Posts

Personal Reflection

Image
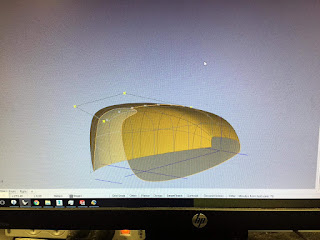
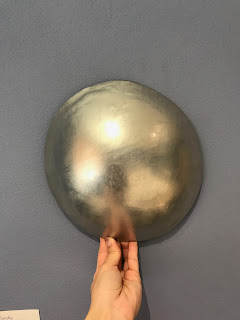
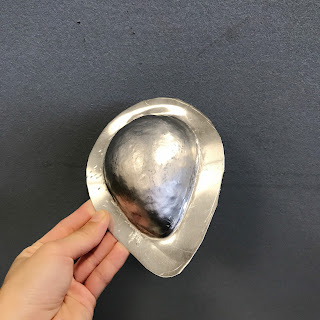
Fuel Tank The project I’ve chosen to do the reflection is the fuel tank because this project costed me the longest time to complete it among other projects. In the process of making the fuel tank, I failed three times because of the accidental edge crack. First of all, lets discuss the weaknesses of this project. In the process of shaping the aluminium sheet, we need to change its radian from two different directions (horizontal, vertical). And it is very easy to break in the edge because of the hard hammering. The tear would be bigger and bigger if we didn’t give up the work. As we mentioned above, we need to change its radian in two directions. The aluminium sheet is soft and easy to be shaped comparing with other metals so it is also easy to deform. For example, when the horizontal radian fits the model shape, then we try to change the vertical radian. The whole aluminium plate will change the shape because of hitting force. This problem is such a big test of our patience. Second

Assignment 2: The Fuel Tank

Image
Aim: Form a group of 10 students who are from different disciplines to make a 1:1 scale model of custom tank for a CB550. Our group will be divided into three groups to make three fuel tanks, and each student is responsible for one side of the fuel tank. We need to shape the aluminium shape to create a fuel tank. Objectives: completed a model, which choose from the three options of fuel tanks. The surface must be smooth and even. The aluminium fuel tank has a flat and smooth edge. the seperate parts of fuel tank must be fit to other two sides. record the process of fabricating the fuel tank. Equipments and tools: Sand bag File Hammers Tin snips Guillotine English wheel Construction steps: Moel construction Firstly, we need to use photogrammetry to fabricate a 1:1 model of fuel tank so that it would be easy to shape the aluminium sheet according to this model. For this 3D model, we need to use revit. For next step, we need to export the model

Aluminium Bowl

Image
Aluminium Bowl making Aim:   Make a smooth bowl with accurate radium according to the class instructions. Objectives: Completed bowl is line with the chosen radian by Russel. The surface is smooth and even. It has a flat and smooth edge. Equipments and tools: Concentric circles Tin snip Shear File Sand paper Mallet Timber stump English wheel Sand bag Hammer (plain head) How we work: Use the concentric circles to mark the circle lines on the metal sheet. Those different size of circle will guide how to make the bowl. Use Tin snip to cut the area outside the outer circle. Use scissors to remove the burs and make the edges smooth. Put the aluminium sheet on a timber stump, which has a curved bottom. And keep hammering it from outer circle to the inner by fibreglass mallet. The intensity of each hit should be controlled evenly. Use the English wheel to remove and smooth the dents on the bowl's surface. Also, it can make the bowl has a evenly radi

The Torus

Image
The Aluminium Torus Aim: Make aluminium torus with specific curving according to the class instructions. Objectives: Smooth and shining surface. Smooth and flat edge. Same curving for torus' both sides. Consistent and even curving for both sides. Equipments and tools: Log Mallet Hammer English wheel Sand paper File How we make it: Mark the metal sheet into three parts. Bend the metal sheet till it fit the curving with the log. Use the plastic head mallet to hit the middle part of metal sheet. Consistently hit the two sides from another way. Use the English wheel to smooth the curving.

The Blister

Image
Aluminium Blister Aim: Make a smooth blister, which fit the mould according to the class instructions. Objectives: Has a smooth and even surface. The edge must be consistently round and clearly defined. The blister fits the mould perfectly. Equipments and tools: Two moulds CNC machine sand paper Mallet Hammers Table clamp Wood blocks How we make it: We need to get the moulds of the blister from CNC machine. Use table clamps to hold the two moulds and the metal sheet in the middle. Use fibreglass mallet to hit the metal sheet evenly and lightly. The wood block with a shape head and help to shape the edge of blister. Keep hammering the blister and make the surface smooth.  

The Tray (with Ziyu Wu)

Image
Aluminium Tray Aim: Make a pair of aluminium trays with another, which fit the wood block perfectly according to the class instructions. Objectives: The two aluminium tray fits each other perfectly. The edges must be flat and smooth. minimal the gaps between two tray when they are closed. Fit the wood block perfectly. Equipments and tools: Shear File Mallet Hammer Disc sander Aviation snips CNC machine How we make it: Create a mould to form the tray. Choose one radium and mark on the plywood block. Use disc sander to shape the plywood block to get the two moulds. Hold the two plywood blocks and the metal board. Use fibreglass to hit it lightly and evenly. Use the aviation snip to cut the excess area. Keep hammering it carefully and lightly to shape the tray.